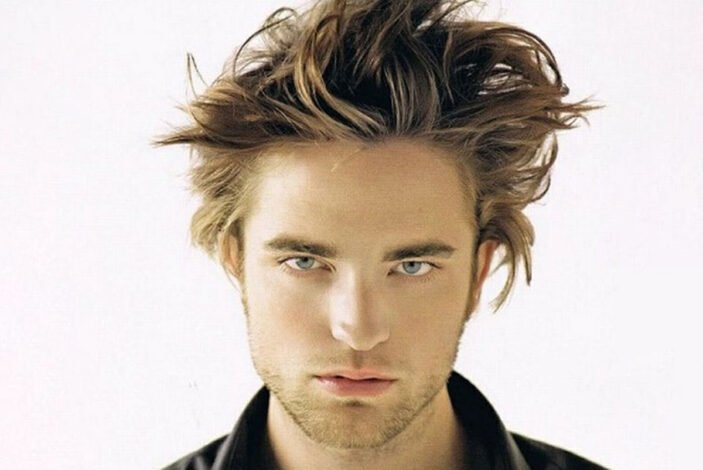
Seeking a ‘disheveled’ yet undeniably cool hairstyle? The messy hair trend is currently taking the grooming world by storm. This isn’t about unkempt, tangled locks, but rather a deliberately relaxed yet stylish aesthetic!
The beauty of the messy hairstyle lies in its versatility. It can be adapted to a variety of cuts, including classic styles, undercuts, quiffs, and the ever-popular Korean two-block. The secret weapon? A combination of styling tools like flat irons and texturizing products such as wax, pomade, or hair gel.
It’s crucial to select products that align with your hair type and desired finish. For instance, thick or wavy hair often benefits from wax or pomade. Conversely, thinner hair might find pomade or gel to be the ideal choice. Remember, a matte finish is achievable with wax or pomade, while gel typically imparts a glossy sheen.
Now, let’s dive into some easy and stylish messy hairstyle tutorials. Keep reading!
Style 1: Classic Messy Hair
This classic messy hairstyle tutorial is perfect for those with medium-length, straight, or wavy hair. Here are the steps:
- Section your hair using salon clips or duckbill clips for easier management.
- Isolate the sections of hair you intend to style for the messy look.
- Take a small section of hair and use a flat iron, rotating it backward to create texture.
- Focus on the ends of the hair to impart more defined texture or bends.
- Apply wax by warming it between your palms and then raking it through your hair with your fingers in a random motion.
- Work slowly from the back to the front to build additional volume.
- Continue to tousle your hair with your wax-coated fingers. The more disheveled, the better the result.
Tip: Opt for a flat iron with a rounded barrel for a more natural, less “broken” finish.
For ease of use, consider trying a wax from Axe. Its formula offers strong hold while being easily rinsable with water. Ideal for those who enjoy frequent style changes!
Style 2: Messy Fringe
This messy hairstyle is ideal for cuts with volume on top, particularly the front fringe. Follow these steps:
- Lightly dampen your hair or style it while it’s still damp after washing.
- Using a blow-dry brush or a round brush, roll your hair forward and upward.
- Utilize a hairdryer to set the rolled shape.
- Apply a small amount of gel to your front hair, distributing it evenly.
- Scrunch your hair to create the desired messy texture.
- Finish with a spritz of hairspray if needed, and your messy fringe is complete!
Tip: If your hair tends to be frizzy or wavy, a preliminary pass with a flat iron before styling the messy look can be beneficial.
Style 3: Messy Curly Hair
This tutorial is perfect for hair that already possesses a natural wave or curl. Let’s get straight to the steps:
- Gently detangle your hair to remove any knots.
- Using a wide-tooth comb, comb your front fringe from the underside upwards and then roll it forward.
- Employ a hairdryer to maintain the shape.
- Apply pomade to your hair, then scrunch it as if you’re grasping it.
- You’re done!
Style 4: Fluffy Hairstyle
This technique is excellent for straight hair that’s challenging to style. The steps are a bit more involved, but the results are well worth it:
- Dampen your hair.
- Apply a sea salt spray to enhance volume (optional).
- Use a diffuser attachment to instantly boost hair volume.
- Conclude by shaping the front section of your hair with a round brush and hairdryer.
Tip: If you frequently use styling products, shampooing daily can help prevent dandruff and scalp irritation.
Style 5: Messy Hair on Long Hair
This method is ideal for those who prefer longer hairstyles. Here’s how to achieve it:
- Dampen your hair.
- Use a headband to keep the front sections of your hair in place.
- Take small sections of your front hair to create a messy effect, but only a little.
- Twist and spray with hairspray to encourage waves.
- Use a hairdryer to set the shape.
Style 6: Messy Quiff
If you already sport a quiff, try styling it with a messy finish:
- Use a hairdryer to add volume. Lift the roots and direct the hairdryer towards them.
- Blow-dry with a brush to shape the quiff. Dry your hair in the opposite direction of your usual part.
- Apply wax and tousle your hair.
- Rake your fingers through your hair, and your messy quiff is ready!
Happy styling, fellas! With these messy hairstyle tutorials, you can effortlessly achieve a stylish and polished look. Don’t hesitate to experiment and find the style that best reflects your personality. Happy styling!



Tinggalkan Balasan